
1 gzip的压缩效果是立竿见影的:


2 网站是否开启gzip的查看方式
2.1 打开Chrome浏览器,按 F12打开调试面板
2.2 切换到network页签,在网络请求列表的表头,鼠标右键==>Response Headers==>Content Encoding
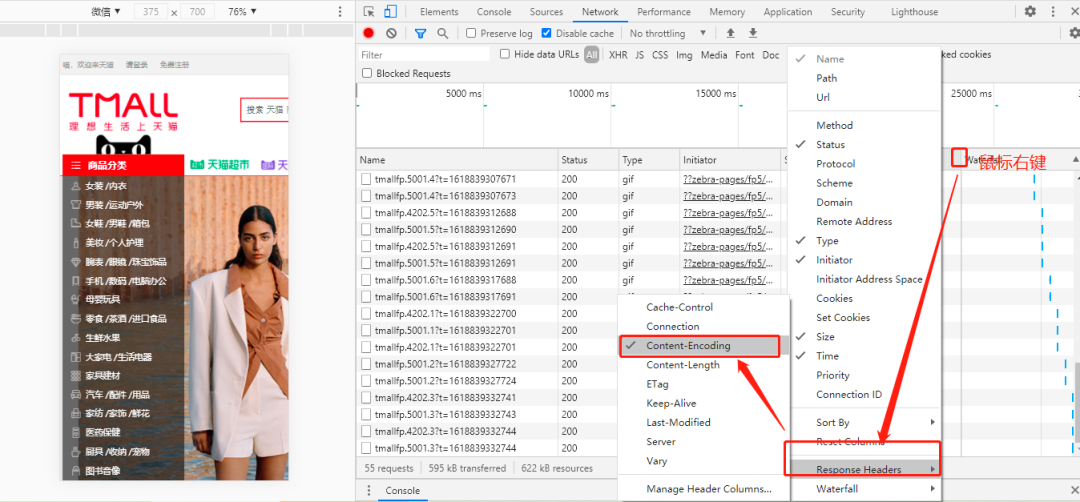
这一栏如果显示gzip,证明启用了gzip压缩。

3. gzip压缩方案
3.1 方案一 前端打包构建时进行gzip压缩
3.1.1 安装插件
compression-webpack-plugin
yarn add -D compression-webpack-plugin@5.0.1
3.1.2 在webpack中配置
compression-webpack-plugin
const CompressionPlugin = require(‘compression-webpack-plugin’);
module.exports = {
plugins: [
new CompressionPlugin({
algorithm: ‘gzip’, // 使用gzip压缩
test: /.js$|.html$|.css$/, // 匹配文件名
filename: ‘[path].gz[query]’, // 压缩后的文件名(保持原文件名,后缀加.gz)
minRatio: 0.8, // 压缩率小于0.8才会压缩
threshold: 10240, // 对超过10k的数据压缩
deleteOriginalAssets: false, // 是否删除未压缩的源文件
}),
],
},
};
3.1.3 在Nginx中配置加载静态的本地gz文件
nginx 静态压缩需要使用
ngx_http_gzip_static_module 模块,nginx_http_gzip_static_module 模块允许发送扩展名为 .gz 的预压缩文件,而不是常规文件。默认情况下未构建此模块,应使用 –with-http_gzip_static_module 配置参数启用它 。重新编译nginx,添加参数–with-http_gzip_static_module
./configure –with-http_gzip_static_module
然后修改 nginx.conf 配置文件:
http {
include mime.types;
default_type application/octet-stream;
#提高服务器读写文件性能
sendfile on;
#tcp_nopush on;
keepalive_timeout 65;
# 开启gzip
gzip_static on;
server {
listen 8462;
server_name localhost;
location / {
root dist;
index index.html index.htm;
}
error_page 500 502 503 504 /50x.html;
location = /50x.html {
root html;
}
}
}
3.2 方案二 服务器在线gzip压缩
http {
include mime.types;
default_type application/octet-stream;
#提高服务器读写文件性能
sendfile on;
#tcp_nopush on;
#keepalive_timeout 0;
keepalive_timeout 65;
# 开启gzip
gzip on;
#压缩级别官网建议是6 数字越大压缩的越好,也越占用CPU时间
#1.随着压缩级别的升高,压缩比有所提高,但到了级别6后,很难再提高;
#2.随着压缩级别的升高,处理时间明显变慢;
#3.gzip很消耗cpu的性能,高并发情况下cpu达到100%
gzip_comp_level 6;
# 压缩的类型 html,css,xml,js,php
# 二进制资源:例如图片/mp3这样的二进制文件,不必压缩;因为压缩率比较小, 比如100->80字节,而且压缩也是耗费CPU资源的.
# text/javascript是IE6,7,8才能识别的js标签
gzip_types text/plain text/css application/xml application/javascript text/javascript application/x-httpd-php;
#nginx用作反向代理时启用
#off – 关闭所有的代理结果数据压缩
#expired – 如果header中包含”Expires”头信息,启用压缩
#no-cache – 如果header中包含”Cache-Control:no-cache”头信息,启用压缩
#no-store – 如果header中包含”Cache-Control:no-store”头信息,启用压缩
#private – 如果header中包含”Cache-Control:private”头信息,启用压缩
#no_last_modified – 启用压缩,如果header中包含”Last_Modified”头信息,启用压缩
#no_etag – 启用压缩,如果header中包含“ETag”头信息,启用压缩
#auth – 启用压缩,如果header中包含“Authorization”头信息,启用压缩
#any – 无条件压缩所有结果数据
gzip_proxied off
# 是否在http header中添加Vary: Accept-Encoding,建议开启
gzip_vary on
# 设置用于处理请求压缩的缓冲区数量和大小
gzip_buffers 4 16k;
# 大于多少字节进行压缩,以K为单位,当值为0时,所有页面都进行压缩
gzip_min_length 10
# 开始压缩的http协议版本(可以不设置,目前几乎全是1.1协议)
gzip_http_version 1.1;
# 配置禁用gzip条件,可以不设置,目前几乎没有IE6,支持正则。此处表示ie6及以下不启用gzip(因为ie低版本不支持)
gzip_disable “MSIE [1-6].”;
server {
listen 8462;
server_name localhost;
location / {
root dist;
index index.html index.htm;
}
error_page 500 502 503 504 /50x.html;
location = /50x.html {
root html;
}
}
}
4.两种方案的优缺点:
1.在前端进行gzip压缩,不耗服务器性能,但需要重新编译nginx,添加gzip_static模块。
2.使用nginx实时进行gzip压缩,缺点就是耗性能,对于前端而言的优点是什么都不用管,因为有时候前端不一定有nginx的配置修改权限。
相关推荐
-
linux怎么移动文件到目录(linux转移文件位置的方法)
使用 mv 命令将一个文件从一个位置移动到另一个位置。 要在有图形界面的计算机上移动一个文件,你要打开该文件当前所在的文件夹,然后打开另一个窗口导航到你想把文件移到的文件夹。最后,…
-
重启apache服务器命令(linux重启apache命令)
一、常用的Web服务器软件: Apache——PHP IIS——ASP.NET Tomacat——Java 二、Web服务器软件Apache下载安装、配置、调试: 1、Apache…
-
linux远程拷贝文件命令(从别的服务器复制文件的步骤)
在开发中经常遇到这样的场景,就是两台Linux服务器间需要互相拷贝文件。常见的场景就是在本机通过堡垒机才能登录到远程的Linux服务器上,而堡垒机上没有相应的ftp可视化工具;这时…
-
linux安装谷歌浏览器命令(linux创建桌面快捷方式)
这应该是一个非常简单的话题,但我写这个是因为我看到很多网站推荐在 Linux Mint 上安装 Google Chrome 的奇怪命令行步骤。那是可行的,但那是不必要的复杂,特别是…
-
linux文件恢复命令(linux文件误删除恢复操作方法)
UrBackup通过创建映像备份保护整个机器免受灾难,通过创建文件备份保护用户或服务器文件。由于文件备份的大小通常可以通过关注机器上最重要的数据来减少,因此它们通常比映像备份运行得…
-
linux服务器搭建实战详解(linux服务器搭建教程)
腾讯云又快过期了,去年脑子抽风买了一年的2核4G,今年有点负担不起了,平常也就挂了个tomcat和nginx,基本属于闲置,所以想着过期就不准备再续了,但是服务器还是得用的。看了看…
版权声明:本文内容由互联网用户自发贡献,该文观点仅代表作者本人。本站仅提供信息存储空间服务,不拥有所有权,不承担相关法律责任。如发现本站有涉嫌抄袭侵权/违法违规的内容, 请发送邮件至 举报,一经查实,本站将立刻删除。