
在Winform开发中,我们往往除了常规的单表信息录入外,有时候设计到多个主从表的数据显示、编辑等界面,单表的信息一般就是控件和对象实体一一对应,然后调用API保存即可,主从表就需要另外特殊处理,本随笔介绍如何快速实现主从表编辑界面的处理,结合GridControl控件的GridView控件对象,实现数据在列表中的实时编辑,非常方便。
一、主从表的界面设计及展示
主从表一般涉及两个以上的表,一个是主表,其他的是从表的,在实际情况下,一般包含两个表较多,我们这里以两个表的主从表关系进行分析处理。
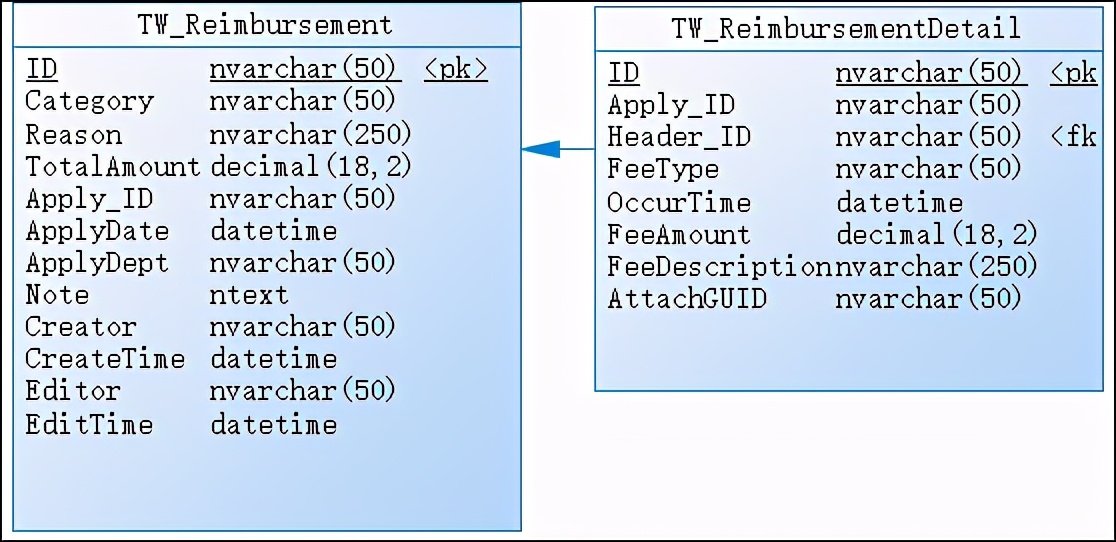
例如我们建立两个报销申请单表关系如下所示。

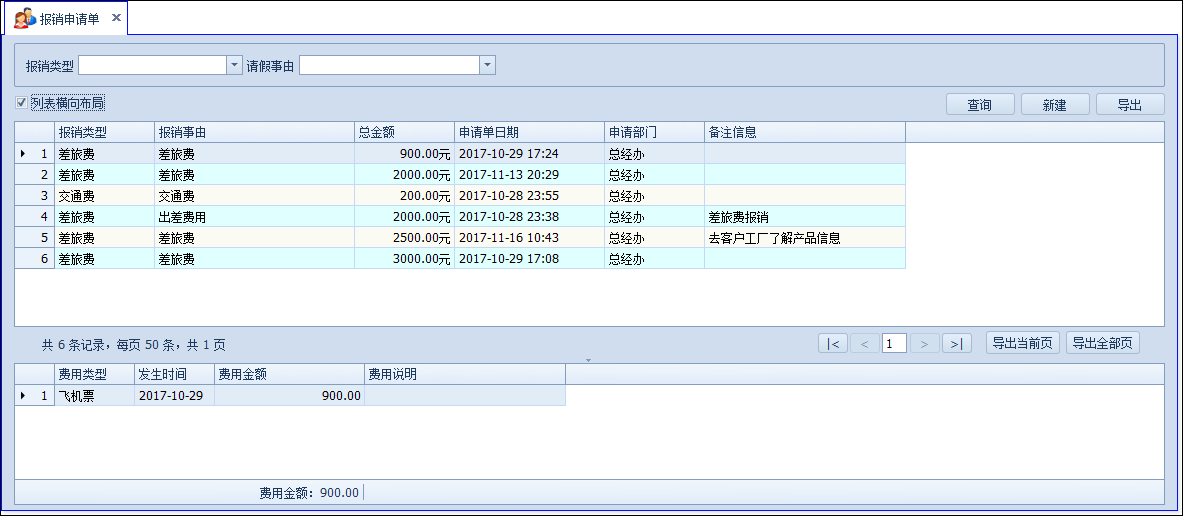
对于报销的主从表信息,我们可以在列表中进行展示,如下界面所示,分为两部分:一部分是主表信息,一部分是从表信息,单击主表信息后,显示对应从表的列表信息。
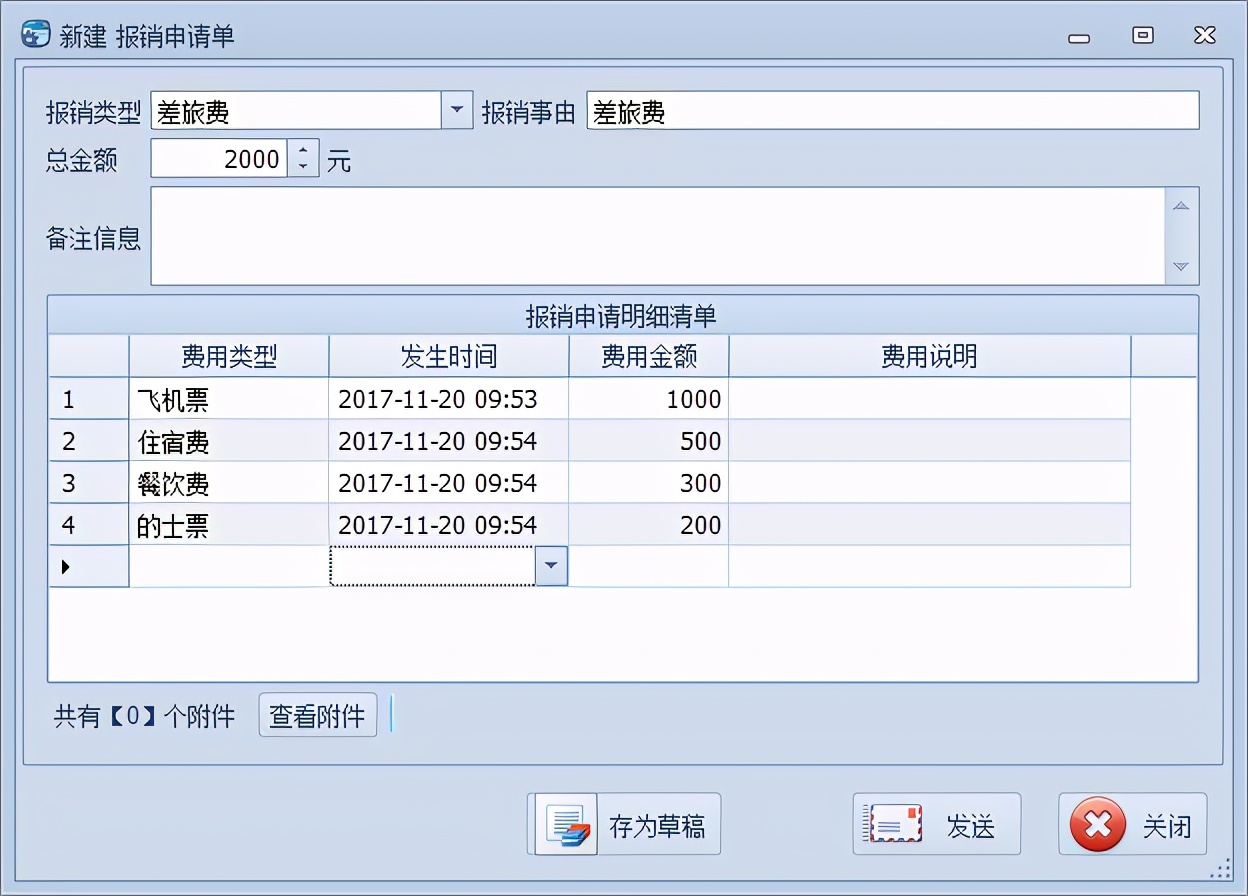
那么我们新增一条主表记录的时候,那么可以弹出一个新的界面进行数据的维护处理,方便我们录入主从表的信息,界面如下所示。

上面界面包括了主表信息,以及从表的信息(在GridView中实时录入)两部分,这样填写后统一进行提交处理。
二、主从表编辑界面的处理
这里主要介绍一下主从表的编辑界面处理,也就是上面这个界面的实现处理。
其中初始化GridView的代码如下所示。
/// <summary>
/// 初始化明细表的GridView数据显示
/// </summary>
private void InitDetailGrid()
{
//初始清空列
this.gridView1.Columns.Clear();
//设置部分列隐藏
this.gridView1.CreateColumn("ID", "编号").Visible = false;
this.gridView1.CreateColumn("Header_ID", "主表编号").Visible = false;
this.gridView1.CreateColumn("Apply_ID", "申请单编号").Visible = false;
//添加下拉列表列,并绑定数据源
this.gridView1.CreateColumn("FeeType", "费用类型", 100).CreateComboBox().BindDictItems("费用类型");
//创建日期列并指定格式
var OccurTime = this.gridView1.CreateColumn("OccurTime", "发生时间", 120).CreateDateEdit();
OccurTime.EditMask = "yyyy-MM-dd HH:mm";
OccurTime.DisplayFormat.FormatString = "yyyy-MM-dd HH:mm";
//创建数值列
this.gridView1.CreateColumn("FeeAmount", "费用金额").CreateSpinEdit();
//创建备注列
this.gridView1.CreateColumn("FeeDescription", "费用说明", 200).CreateMemoEdit();

//初始化GridView,可以新增列
this.gridView1.InitGridView(GridType.NewItem, false, EditorShowMode.MouseDownFocused, "");
//转义列内容显示
this.gridView1.CustomColumnDisplayText += new CustomColumnDisplayTextEventHandler(gridView1_CustomColumnDisplayText);
//处理单元格的样式
this.gridView1.RowCellStyle += new RowCellStyleEventHandler(gridView1_RowCellStyle);
//不允许头部排序
this.gridView1.OptionsCustomization.AllowSort = false;
//绘制序号
this.gridView1.CustomDrawRowIndicator += (s, e) =>
{
if (e.Info.IsRowIndicator && e.RowHandle >= 0)
{
e.Info.DisplayText = (e.RowHandle + 1).ToString();
}
};

//对输入单元格进行非空校验
this.gridView1.ValidateRow += delegate(object sender, ValidateRowEventArgs e)
{
var result = gridControl1.ValidateRowNull(e, new string[]
{
"FeeType"
});
};
//新增行的内容初始化
this.gridView1.InitNewRow += (s, e) =>
{
gridView1.SetRowCellValue(e.RowHandle, "ID", Guid.NewGuid().ToString());
gridView1.SetRowCellValue(e.RowHandle, "Header_ID", tempInfo.ID);
gridView1.SetRowCellValue(e.RowHandle, "Apply_ID", tempInfo.Apply_ID);
gridView1.SetRowCellValue(e.RowHandle, "OccurTime", DateTime.Now);
};
}

void gridView1_RowCellStyle(object sender, DevExpress.XtraGrid.Views.Grid.RowCellStyleEventArgs e)
{
GridView gridView = this.gridView1;
if (e.Column.FieldName == "FeeAmount")
{
e.Appearance.BackColor = Color.Green;
e.Appearance.BackColor2 = Color.LightCyan;
}
}
void gridView1_CustomColumnDisplayText(object sender, DevExpress.XtraGrid.Views.Base.CustomColumnDisplayTextEventArgs e)
{
string columnName = e.Column.FieldName;

if (e.Column.ColumnType == typeof(DateTime))
{
if (e.Value != null)
{
if (e.Value == DBNull.Value || Convert.ToDateTime(e.Value) <= Convert.ToDateTime("1900-1-1"))
{
e.DisplayText = "";
}
else
{
e.DisplayText = Convert.ToDateTime(e.Value).ToString("yyyy-MM-dd HH:mm");//yyyy-MM-dd
}
}
}
}
上面代码都有详细的备注,主要就是我们根据数据库表的关系,创建对应显示的字段即可,其中有需要隐藏的那么就不要显示(方便获取对应的值)
//设置部分列隐藏
this.gridView1.CreateColumn("ID", "编号").Visible = false;
this.gridView1.CreateColumn("Header_ID", "主表编号").Visible = false;
this.gridView1.CreateColumn("Apply_ID", "申请单编号").Visible = false;
如果需要绑定下拉列表类似的字段,那么创建对应的数据类型,然后调用绑定函数绑定即可,如下面代码
//添加下拉列表列,并绑定数据源
this.gridView1.CreateColumn("FeeType", "费用类型", 100).CreateComboBox().BindDictItems("费用类型");
如果是一些特殊的输入需要设置格式显示或者掩码,那么如下所示
//创建日期列并指定格式
var OccurTime = this.gridView1.CreateColumn("OccurTime", "发生时间", 120).CreateDateEdit();
OccurTime.EditMask = "yyyy-MM-dd HH:mm";
OccurTime.DisplayFormat.FormatString = "yyyy-MM-dd HH:mm";
另外有一个值得注意的就是我们新增一行从表记录的时候,需要记录一些主表的属性,这样的话,我们就是在行初始化的时候,赋值给从表的隐藏列即可。
//新增行的内容初始化
this.gridView1.InitNewRow += (s, e) =>
{
gridView1.SetRowCellValue(e.RowHandle, "ID", Guid.NewGuid().ToString());
gridView1.SetRowCellValue(e.RowHandle, "Header_ID", tempInfo.ID);
gridView1.SetRowCellValue(e.RowHandle, "Apply_ID", tempInfo.Apply_ID);
gridView1.SetRowCellValue(e.RowHandle, "OccurTime", DateTime.Now);
};
在界面中如果我们需要显示主表的信息,那么就根据条件获取对应的主表记录对象,然后显示给界面控件即可。
/// <summary>
/// 显示常规的对象内容
/// </summary>
/// <param name="info"></param>
private void DisplayInfo(ReimbursementInfo info)
{
tempInfo = info;//重新给临时对象赋值,使之指向存在的记录对象

txtCategory.Text = info.Category;
txtReason.Text = info.Reason;
txtTotalAmount.Value = info.TotalAmount;
txtNote.Text = info.Note;
}
而保存的时候,我们把界面内容重新赋值给对应的主表对象。
/// <summary>
/// 编辑或者保存状态下取值函数
/// </summary>
/// <param name="info"></param>
private void SetInfo(ReimbursementInfo info)
{
info.Category = txtCategory.Text;
info.Reason = txtReason.Text;
info.TotalAmount = txtTotalAmount.Value;
info.Note = txtNote.Text;

info.ApplyDate = DateTime.Now;
info.ApplyDept = base.LoginUserInfo.DeptId;
info.CurrentLoginUserId = base.LoginUserInfo.ID;
}
而我们需要获取GridView明细输入的时候,就通过一个函数遍历获取GridView的行记录,转换为相应的对象即可,如下所示。
/// <summary>
/// 获取明细列表
/// </summary>
/// <returns></returns>
private List<ReimbursementDetailInfo> GetDetailList()
{
var list = new List<ReimbursementDetailInfo>();
for (int i = 0; i < this.gridView1.RowCount; i++)
{
var detailInfo = gridView1.GetRow(i) as ReimbursementDetailInfo;
if (detailInfo != null)
{
list.Add(detailInfo);
}
}
return list;
}
这样处理完这些信息后,我们就可以在主表保存的时候,同时保存明细表信息即可。
/// <summary>
/// 新增状态下的数据保存
/// </summary>
/// <returns></returns>
public override bool SaveAddNew()
{
ReimbursementInfo info = tempInfo;//必须使用存在的局部变量,因为部分信息可能被附件使用
SetInfo(info);
info.Creator = base.LoginUserInfo.ID;
info.CreateTime = DateTime.Now;

try
{
#region 新增数据

bool succeed = BLLFactory<Reimbursement>.Instance.Insert(info);
if (succeed)
{
//可添加其他关联操作
var list = GetDetailList();
foreach(var detailInfo in list)
{
BLLFactory<ReimbursementDetail>.Instance.InsertUpdate(detailInfo, detailInfo.ID);
}

return true;
}
#endregion
}
catch (Exception ex)
{
LogTextHelper.Error(ex);
MessageDxUtil.ShowError(ex.Message);
}
return false;
}
其中代码
BLLFactory<ReimbursementDetail>.Instance.InsertUpdate(detailInfo, detailInfo.ID);可以对新增记录保存,也可以对存在的记录进行更新。
通过上面的介绍,我们可以看到不同的主从表其实逻辑还是很通用的,我们可以把它们的逻辑抽取出来,通过代码生成工具进行快速生成即可。
相关推荐
-
如何进行品牌定位,品牌定位的七个步骤
“定位”这个词从发明以来就被滥用了,但不可否认的是,“定位”方法已经成为品牌推广中不可或缺的一部分。 定位源自艾里斯和特劳特的合著著作,号称“有史以来对美国营销影响最大的观念”,但…
-
什么网游比较赚人民币,网络游戏赚人民币排行
相信NBE这里有很多和我一样的人吧?走过南,闯过北,漂泊几年,啥都干过,外面世界的精彩见识过了!理所当然的回家结婚,生孩子,不想出去打工了,赚不了多少钱不说,不能和家人一起生活是最…
-
国内云服务器排名介绍,中国有多少云服务器
云服务器(Elastic Compute Service,简称ECS)是一种简单高效、处理能力可弹性伸缩的计算服务,帮助您快速构建更稳定、安全的应用,提升运维效率,降低IT成本,使…
-
什么是百度指数,简述百度指数的基本功能及作用
百度的搜索引擎技术在全世界只有四个国家有,分别是美国,俄罗斯,韩国,日本。因为百度的搜索引擎算法不单纯的是检索,更多的是分析你所想要的信息,然后给出结果,当然这“结果”是需要自己去…
-
哪一款游戏赚钱最快,适合长期赚点零花钱的五款游戏推荐
最近工作不那么忙,学车的时候看见教练在刷游戏,说是可以挣钱,我就进入这个领域试了试,现就亲测的九款游戏,带大家看一下这些游戏是怎样让大家挣到钱的。 总的来说,还是建议找一份工作认真…
-
笔的牌子有哪些,钢笔品牌世界排名
世界上有许多东西用于写作,如平板电脑,计算机,打字机和笔。钢笔是世界上非常常见的物品,每个人都可以在日常生活中使用,市场上有很多钢笔品牌它们质量不等用时价格也不一样。一些好的钢笔配…
版权声明:本文内容由互联网用户自发贡献,该文观点仅代表作者本人。本站仅提供信息存储空间服务,不拥有所有权,不承担相关法律责任。如发现本站有涉嫌抄袭侵权/违法违规的内容, 请发送邮件至 举报,一经查实,本站将立刻删除。